Physical Address
304 North Cardinal St.
Dorchester Center, MA 02124
Physical Address
304 North Cardinal St.
Dorchester Center, MA 02124
Gadgets & Lifestyle for Everyone
Gadgets & Lifestyle for Everyone
Google’s location tracking can feel intrusive, but you have full control to turn it off. Here’s your complete guide on how to turn off Google location history across all your devices, plus how to delete past data and ensure tracking stays off.
| Topic | What It Covers |
|---|---|
| Turn off Location History | Stop future location tracking |
| Delete past history | Remove existing location data |
| Web & App Activity | The second tracking setting you must disable |
| Auto-delete options | Automatically remove old data |
| Recent changes | Google’s Timeline storage update |
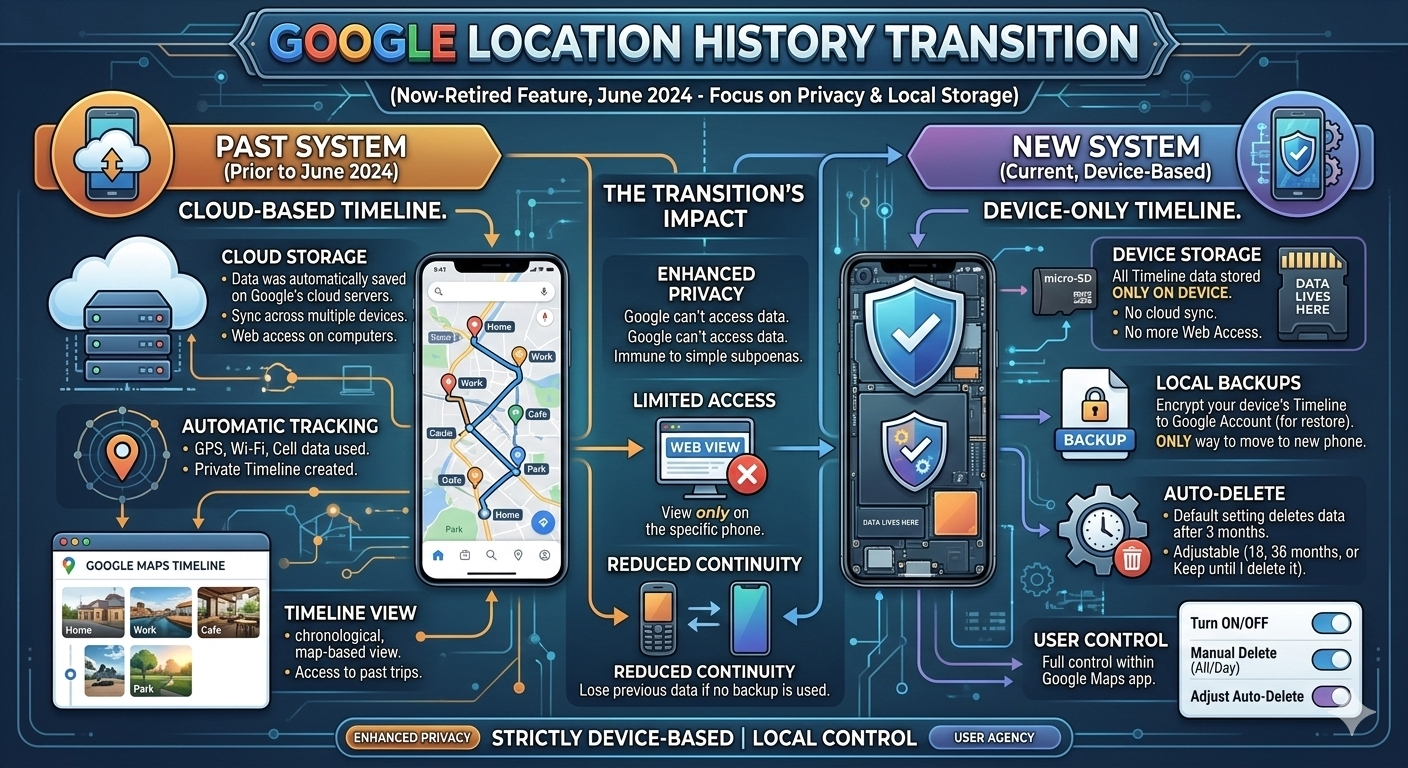
Location History is a Google Account setting that creates your Timeline—a personal map showing places you’ve been, routes you’ve taken, and trips you’ve completed . When enabled, your precise device location is regularly saved to both your devices and Google’s servers, even when you’re not actively using Google apps .
The good news: Location History is off by default for new Google Accounts . If you’ve previously turned it on, you can disable it anytime.
Step 1: Open the Google app on your iPhone .
Step 2: Tap your profile photo or initial in the top-right corner, then select Manage your Google Account .
Step 3: At the top, tap Data & privacy .
Step 4: Scroll down to “History settings” and tap Timeline (formerly called Location History) .
Step 5: Turn the toggle off . Confirm by tapping Pause then Okay .
Step 1: Go to the Location History section of your Google Account (you can search “Location History” or visit directly) .
Step 2: At the top, you’ll see an option for “Your account and all devices” . Turn the toggle off .
Step 3: You can also control individual devices by scrolling to “This device” or “Devices on this account” and toggling specific devices off .
Step 1: Sign in to your Google Account and go to Activity controls .
Step 2: Find Location History (or Timeline) and click Turn off .
Step 3: Google will show a pop-up explaining the effects. Click Pause to confirm .
When Location History is turned off, your device stops saving its location to your Timeline . However:
Many people don’t realize that turning off Location History isn’t enough. Google also tracks location through Web & App Activity, which saves data from your use of Google sites, apps, and services—including your IP address and general location .
Step 1: Go to your Google Account’s Activity controls page .
Step 2: Find Web & App Activity and click Turn off .
Step 3: A pop-up will warn about reduced personalization. Click Pause to confirm .
Step 4: After pausing, you’ll be offered the option to delete old activity. Click “Delete old activity” and choose your preferred time range .
Why this matters: Even with Location History off, Web & App Activity can continue collecting location information from your IP address and general device area . Disabling both gives you true privacy.
On iPhone/Android:
On Computer:
You can configure Google to automatically delete your Location History after a set period .
Google is migrating Timeline data from cloud storage to on-device storage . This change affects how your location history is saved:
If you want to keep your old Timeline data, you must update your settings before your deadline. Otherwise, it will be automatically deleted .
Some users report Location History reactivating after updates . Check your settings periodically, especially after:
Timeline may not be available if :
Yes, you’ll lose personalized experiences like :
| Your Goal | Action |
|---|---|
| Stop future tracking | Turn off Location History + Web & App Activity |
| Remove all past data | Delete all Location History |
| Keep some privacy but maintain features | Set auto-delete to 3 months |
| Maximum privacy | Turn off both settings + delete all history |
| Keep old Timeline data | Update settings before deadline |
✅ Turned off Location History
✅ Turned off Web & App Activity
✅ Deleted existing location history
✅ Set up auto-deletion (optional)
✅ Checked Timeline migration deadline
✅ Verified settings after device updates
Turning off Google location history is straightforward once you know where to look. The key is understanding that Location History and Web & App Activity are separate settings—you must disable both for complete privacy .
After disabling tracking, take a few extra minutes to delete your past data and set up auto-deletion to prevent future accumulation. Check your settings occasionally, as updates can sometimes revert them .
Your movements are your own business. With these steps, you can use Google’s services while keeping your location private.